REST API Contact Resolution
Overview
Connect any external REST API to resolve caller identity in real-time. When a call arrives, Call Telemetry sends the caller's phone number to your API endpoint and uses the response to display the caller's name on Cisco IP phones. This works with any system that exposes a REST/JSON API -- ServiceNow, Salesforce, custom CRM systems, or internal databases.
For a step-by-step walkthrough using a sample webhook app, see the Webhook CRM Integration guide.
Requirements
- Call Telemetry Appliance 0.8.6 or later
- Call Telemetry Premium License
- Cisco CallManager with CURRI API Integration
- Configured External Call Control Profile Inspection - A route pattern, translation pattern, or phone extension must be enabled for Call Telemetry policy inspection
- An external REST API endpoint accessible from the Call Telemetry appliance
Configuration
Create a Webhook App
- Navigate to Realtime Policies → Apps
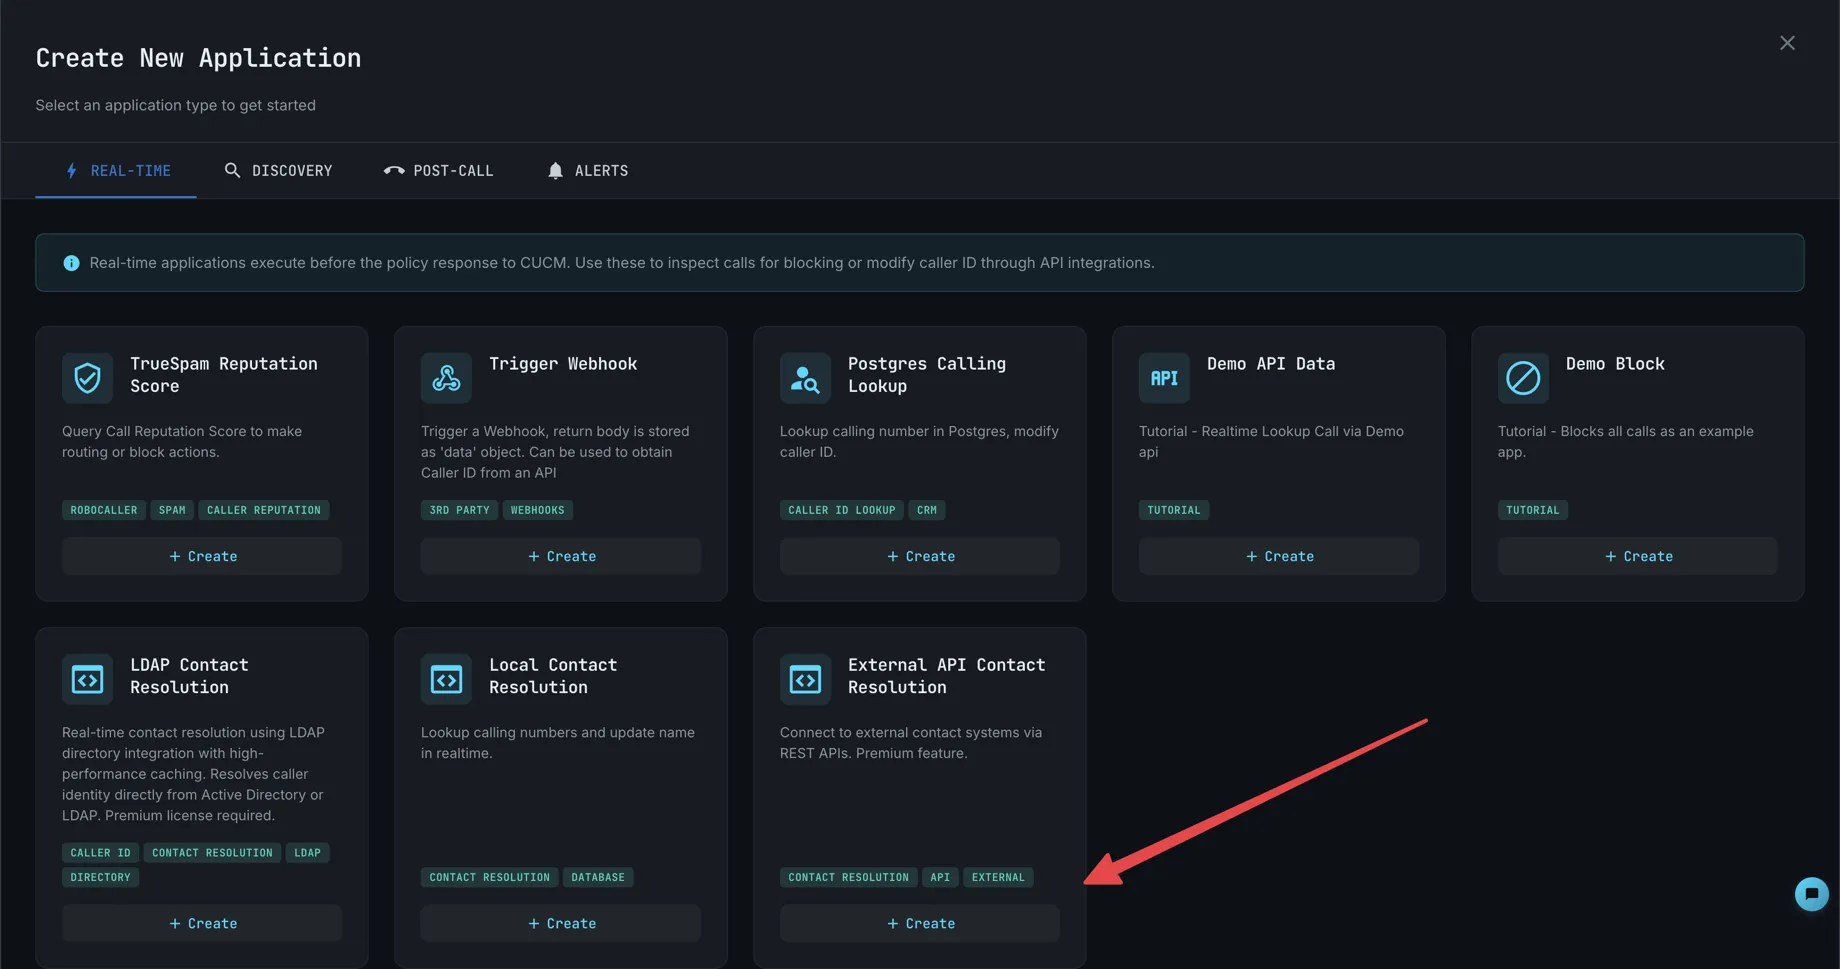
- Click Add → Select External API Contact Resolution under the Realtime tab
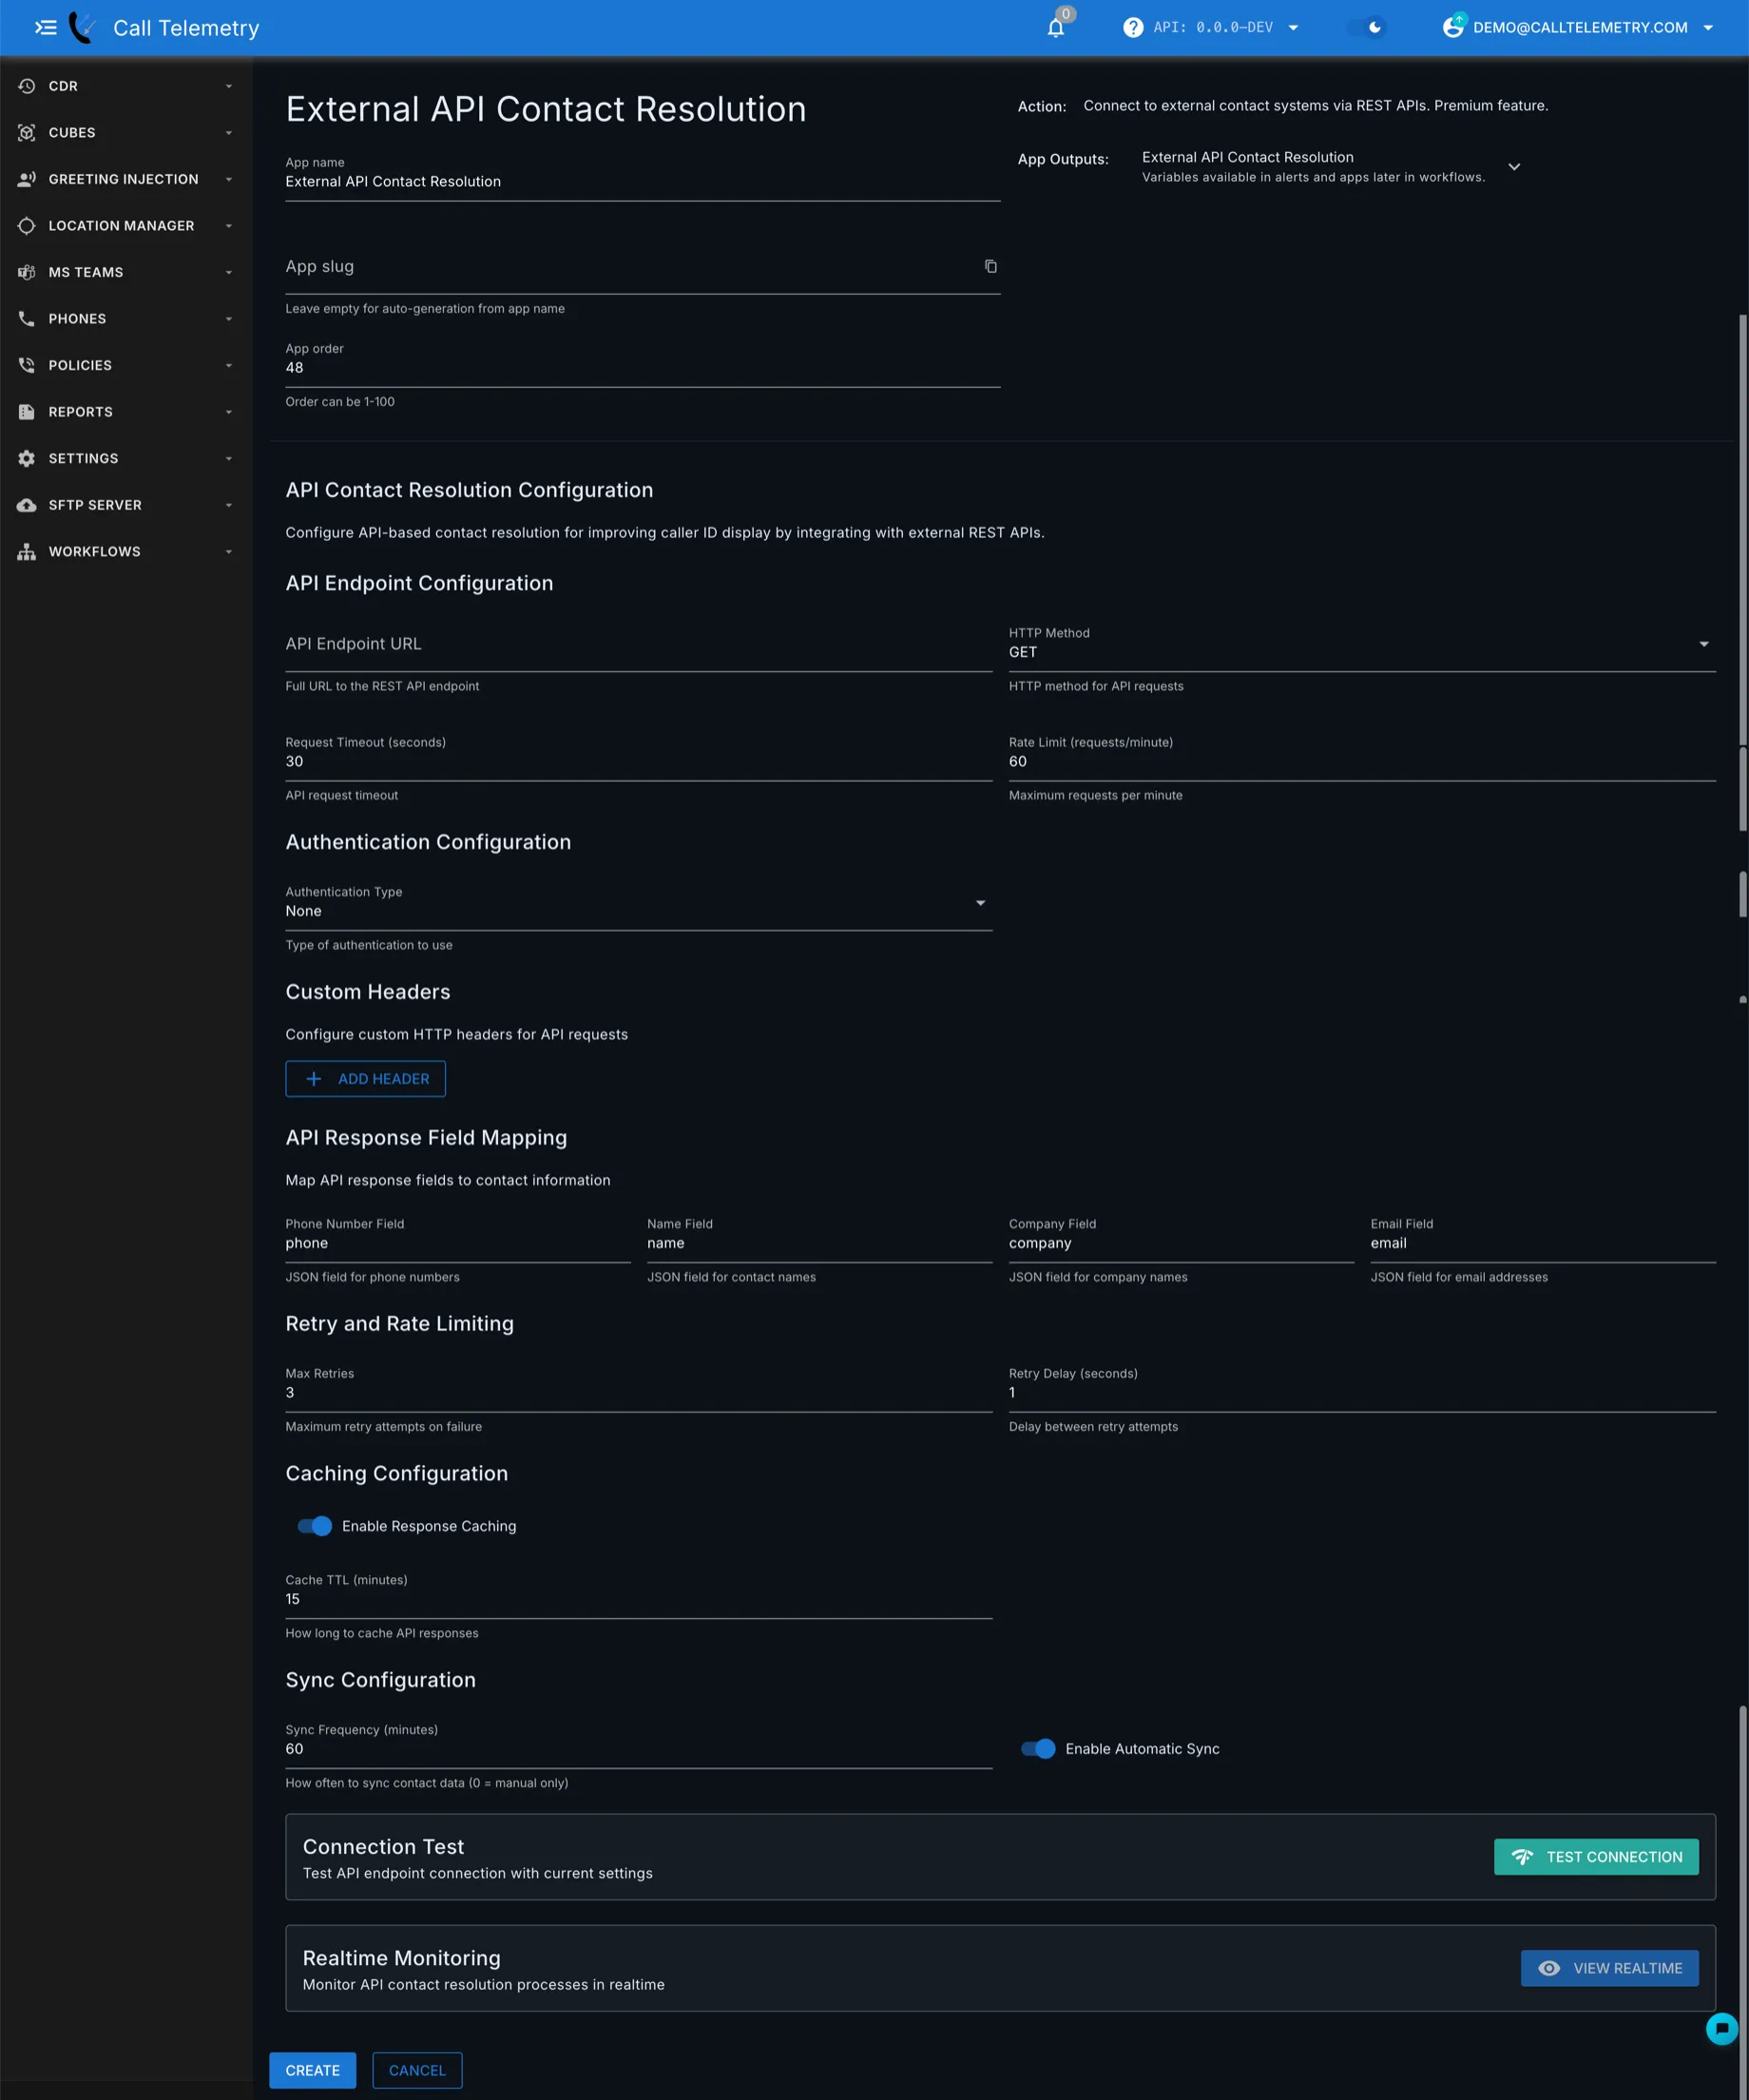
- Configure the webhook:
- Name -- Descriptive name (e.g., "ServiceNow Caller Lookup")
- URL -- Your API endpoint URL. Use
{event.calling_number}as a template variable for the caller's phone number. - HTTP Method --
GETorPOSTdepending on your API - Headers -- Add authentication headers if required (e.g.,
Authorization: Bearer <token>)
- Save the app
Associate with a Policy Rule
- Navigate to Policies and open your call policy
- Select the rule that handles incoming calls
- Click Associate App and select your webhook
- Save the rule
The webhook now executes for every call that matches the rule's trigger pattern.
Template Variables
Use these variables in the API URL and request body to pass call data to your API:
| Variable | Description |
|---|---|
{event.calling_number} | The caller's phone number |
{event.called_number} | The number that was dialed |
{event.calling_device} | The calling device name |
Variables are replaced with actual values at runtime before the API request is sent.
Response Mapping
The API response is available in the rule configuration under app_data.webhook.data. Use dot notation to reference nested fields from your API response:
| Template Path | Description |
|---|---|
{app_data.webhook.data.name} | Caller name from API response |
{app_data.webhook.data.company} | Company name from API response |
{app_data.webhook.data.account_id} | Account identifier from API response |
To display the resolved name on Cisco IP phones, map the caller name field to Calling Party Name in your rule's modifiers section.
Example API Request
GET https://api.yourcrm.com/contacts?phone={event.calling_number}
Example Response:
{
  "name": "Jane Smith",
  "company": "ACME Corp",
  "account_id": "ACC-12345"
}
In this example, set the Calling Party Name modifier to {app_data.webhook.data.name}. The phone display shows "Jane Smith" instead of the raw phone number.
Testing Your Integration
Use Call Tests to verify your API integration before routing live calls:
- Navigate to Policies → Call Test
- Enter a test calling number that exists in your CRM
- Run the test
- Check
app_data.webhook.datain the results for your API response - Verify the Calling Party Name in the CURRI response shows the resolved name
If the test returns the correct name, your integration is working. Live calls through the same policy rule display the resolved name on Cisco IP phones.
Troubleshooting
No data returned? Use the Test Connection button in the app settings to verify the endpoint is reachable. Check the API URL and authentication configuration.
Authentication errors? Verify the authentication type and credentials match what your API expects. Use the Custom Headers section if your API requires non-standard headers.
Wrong name displayed?
Check the API Response Field Mapping — make sure the JSON field names match your API's response structure (e.g., name, company, email).
Connection test passes but calls don't resolve? Verify the app is assigned to a policy rule under the Apps tab. The app only runs for calls that match the rule's trigger pattern.
Related Topics
- Webhook CRM Integration -- Step-by-step example with screenshots
- PostgreSQL CRM Integration -- Direct SQL database lookups
- LDAP Contact Resolution -- Active Directory integration
- CRM & Contact Resolution Overview -- Data source comparison